Deep Dive: The Ultimate Guide to Perfect Dip Nails
All About Dip Nails!
With Dip Nails rising in popularity, many customers have been asking all about the newest trend: How do you apply Dip nails? How do you remove Dip nails? How long should Dip nails last? How are Dip Nails different from Acrylic nails? We’re glad you asked, and we have the answers to your questions.
What are Dip Nails?
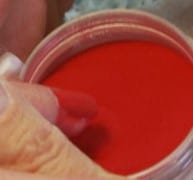
Dip systems have been around for over 20 years, but recently they have gained global popularity for providing the strength and durability of acrylic systems with a visually unique and low odor application. Dip Nails are an acrylic enhancement that utilizes a different application method than the traditional monomer/polymer or liquid/powder technique. While Dip powder itself is still very much the same as traditional acrylic polymers, the chemical reaction of resins-to-moisture differs from traditional liquid & powder acrylic products. Dip Resin is a Cyanoacrylate adhesive (similar to Super Glue) that sticks very well to the nail bed and hardens very quickly when contacted by an Activator.
How long do Dip Nails last?
The length of time a Dip service will last for a client varies for everyone. Ideally, Dip nails will stay on indefinitely based upon how quickly your client’s nails grow out. The Dip Resin bonds to the natural nail very well, much like a super glue, locking the enhancement on tight. Unlike traditional liquid and powder acrylic nails, you cannot perform a routine fill for this style of enhancement. The dipped color will have to be filed down almost the whole way (if reapplying the same color) and reapplied for each service in a recommended time of 2-3 weeks.
How do you apply Dip Nails?
1. The first step is always going to be Nail Prep to ensure the nail you’re working on is in the best possible condition to receive an enhancement. We highly recommend using PH Plus to maximize adhesion of the enhancement to the nail.
 2. Once the nail bed is prepared, apply a thin layer of Dip Resin evenly across the nail. Thin, even coats perform and look the best! Wipe away any resin that may have gotten on your client’s skin.
3. With the lid still on, shake the powder jar to fluff up the powder. Powder will compact itself naturally as settling occurs with each tap on the jar, including setting it down.
4.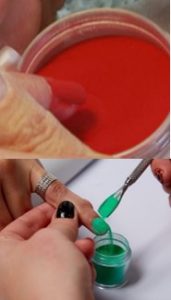 After the Dip Resin has been applied to the nail, dip the wet nail into the freshly fluffed dip powder at an angle (most prefer 45°). Gently knock or tap the bottom of the finger to let excess powder fall off. You can also lightly use a soft, dry brush to quickly remove any remaining loose powder.
Note: Some technicians prefer scooping powder from the container and dumping it over the nail instead of “dipping” a finger into their powder.
5. Once the color has been applied, use a small amount of Dip Activator over the top of the powder. This will cause the dip resin underneath the powder to cure very quickly, locking the color in place.
- If Dip Resin is on your client’s skin when an activator is applied, the chemical reaction between the resin and activator will produce a burning sensation.
- Optional! Repeat steps 2-4 if you or your client desire additional applications/layers of color. Note – Each additional application will make the enhancement thicker.
- Optional! If any filing needs to be done to even the application of the cured acrylic, be sure to do so before applying the finishing top coat.
6. After reaching the desired amount of color or degree of thickness there are a few varying ways to complete your work with a nice shiny finish:
- Apply a thin, smooth layer of Dip Resin and allow it to air dry without use of the activator. This will take approximately 4-5 minutes, but will leave a shiny finish.
– – OR – – - Apply a thin layer of Dual Sealer. Dual Sealer will require use of a light (UV or LED) to cure this top layer. If you or your client wish to avoid using a light entirely, a Sealer would not be your best choice.
7. Place the brush you used to apply the Dip Resin in Dip Brush Saver for 3 to 4 minutes. Dip Brush Saver is a solvent that breaks down dip resins and glues and can be used during and after applications. This will clean your brushes without over drying them, allow for more consistent application and is considered a more sanitary business practice.
How do you remove Dip Nails?
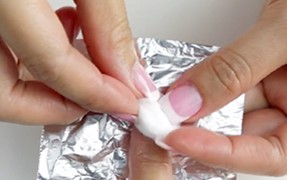 1. Using a file or a drill, remove the top layer of the dipped nails. This will increase the effectiveness of the acetone by allowing it to reach deeper into the enhancement.
2. Place cotton balls saturated in 100% acetone on the nail and wrap with aluminum foil. Remove the wraps after 10-15 minutes.
– – OR – –
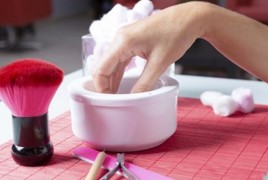 Soak nails in 100% acetone for 10-15 minutes.
3. Slowly remove the acrylic with the use of a cotton ball soaked in 100% acetone and an orangewood stick if necessary.
4. Using a file or a light-handed drill, gently go over the natural nail to remove any remaining color.
5. If there is still color left that looks like staining, it will fade in a few hours. This is most commonly noticed when switching colors from a heavily pigmented dark colored powder to one that is much lighter.
- If your customer wants to frequently switch their colored acrylics, you may want to recommend a soft-gel, or gel-polish manicure instead.
Ready to get started with your own Dip system? Click here to find all the products you’ll need to get started, or below for more available bulk discounts!
Step 1: PH Plus – Bonder
Step 2: Dip Resin
Step 3: Brush On Activator
Step 4: Dip Resin
Step 5: Dip Brush Saver