Solving the Lift: Why Your Clients’ Acrylics Aren’t Staying
Why Are Your Client’s Acrylics Lifting?

Lifting is the ultimate “time-killer.”
When a client comes back with three nails popping off, it slows down your day, eats into your profits, and hurts your reputation.
As a tech, you’re often racing the clock to maximize your income. However, taking a “shortcut” during prep or application usually results in a 20-minute repair later that you won’t get paid for.
At DeEnterprises, we create the chemistry behind the product every day—and the good news is that most lifting is caused by simple, fixable habits.
Here is how to troubleshoot and solve the lifting epidemic at your desk.
1. Prep is Everything: Hunting the “Invisible” Culprit
If the nail itself is not completely prepared to receive the enhancement, it will end up just like putting a tempered glass screen on your phone without cleaning it. With the phone, you can see the unbonded spots nearly immediately, but with an acrylic nail it may take a few days to show itself. While the time for the service breakdowns may vary slightly, the results are the same – Lifting is an unwelcome problem. You can use the best acrylic in the world, but it won’t stick to skin. The #1 cause of lifting is non-living tissue (cuticle) left on the nail plate.
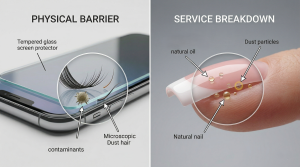

– The Invisible Cuticle: Even if the nail looks clean, there is often a thin layer of skin attached to the plate. If you apply acrylic over this, the product will lift as the skin naturally sheds. Use a curette or a fine-grit sanding band to gently clear the entire plate, especially around the eponychium.
– Dehydrate Thoroughly: Use a high-quality dehydrator to remove surface oils.
– The “Squeaky” Test: The nail should look chalky and matte. If there is a shiny spot, there is still oil or skin there. Don’t touch the nail with your own fingers after prepping, or you’ll reintroduce oils!
2. The Goldilocks Ratio: Finding “Just Right”
The bond between the liquid (monomer) and powder (polymer) is a chemical reaction. If your ratio is off, the “glue” that holds the nail on won’t work correctly.
– Too Wet: If your bead is runny, the excess liquid pools into the sidewalls. As the monomer evaporates, the product shrinks away from the nail, creating a gap for water and oil to enter.
– Too Dry: If the bead is “frosted” or doesn’t smooth out, it won’t “wet” the nail plate. It sits on top of the nail like a rock rather than soaking into the microscopic grooves for a strong grip.
– The Goal: Your bead should look like a smooth, satin pearl. It should hold its shape but begin to self-level within 2–3 seconds.
3. The “Dead Zone”: Avoid the Flood
The “Dead Zone” is the tiny 1mm gap between the product and the skin. If you touch the skin, you have already failed the service.
 – Capillary Action: If your acrylic touches the cuticle or sidewall while it’s wet, it will “wick” onto the skin. Once it hardens, the movement of the finger will pull that product away from the nail immediately.
– Leave a Margin: Always leave a hairline gap between the product and the soft tissue.
– Thin Your Edges: Use your brush to “taper” the product near the cuticle. The acrylic should be paper-thin at the back and thicker in the “apex” (the center). A thick “cliff” of acrylic at the cuticle is a magnet for lifting.
4. Client Habits: The Home Care Talk
Sometimes, the lifting isn’t your fault—it can absolutely be your client’s. Give your clients these three quick “rules” to help your work last:
– Jewels, Not Tools: Remind them that nails are not screwdrivers or soda-can openers. Prying things with the tip of the nail puts “leverage” on the cuticle area, snapping the bond.
– Oil is Your Friend: Paradoxically, applying cuticle oil daily keeps the enhancement flexible. Dry acrylic becomes brittle and is more likely to “pop” off the natural nail.
– Gloves for Cleaning: Household chemicals and long exposure to hot soapy water (like doing dishes) can soften the natural nail under the acrylic, leading to delamination.
Need to restock on high-performance monomer that does the heavy lifting for you?
DeEnti Nomma Plus has you covered!